This article assumes a basic level of technical proficiency, and some degree of familiarity with the hardware used.
I recently purchased a Raspberry Pi because it’s about the coolest thing I can think of for under $40. It’s great for little projects because you can use it to solve very easy problems, and more complex problems.
Another interest of mine is the crypto-currency known as bitcoin. I think the entire idea is fascinating, from the cultural impact to the impressively complicated mathematics behind it. I thought it’d be fun to try and build a bitcoin mining rig!
Worth noting: bitcoin mining is no longer profitable for most, this is purely an interesting exercise.
Getting Started
First, my build was guided by an Adafruit project, but I found some things had to be modified to get it to work for me and this particular ASIC device. If you use the hardware in the Adafruit article you can just use their instructions to achieve the same result.
Check out the Adafruit Article Here!
Supplies:
1x Raspberry Pi Model-B (Purchase at Amazon)
1x Adafruit 16×2 LCD Plate (Optional) (Purchase at Amazon)
Powered USB Hub (Purchase at Amazon)
1x Antminer U1 ASIC Miner (*NOTE* These instructions are fairly specific to this particular miner, so if you purchased a different one, you’ll need to adjust your settings) (Purchase at Amazon)
What is an ASIC Miner/Why do I need this? Check this out for a pretty good explanation:
Bitcoin Mining Hardware – Vice
Step 1
Get your Pi set up with Raspbian. I won’t go through an exhaustive tutorial since the folks at Raspberry Pi were kind enough to do that for us.
Raspberry Pi Quick-Start Guide
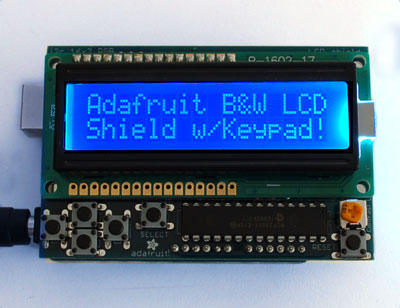
Step 2 (Optional) – Build the Adafruit 16×2 LCD Plate
Assemble and install the Adafruit 16×2 LCD Plate. I bought and used this for my rig because I thought it looked cool, and I liked that I got to assemble it myself. It’s basically a project all on it’s own. For this article, I’ll go over getting the miner set up without using this, and then at the end I’ll show how they can work together.
Adafruit has a wonderful tutorial on building and setting it up for basic use.
Adafruit 16×2 Character LCD + Keypad for Raspberry Pi
When your done, you’ll hopefully have something that looks like this!
Step 3 – Set Up Mining
First, plug in your powered USB hub to the Raspberry Pi. The Antminer ASIC device draws too much power to use the Pi’s onboard power.
Next log into your Pi, and let’s get started!
- Update your Pi before getting started with
sudo apt-get update
- Install dependencies
sudo apt-get install libusb-1.0-0-dev libusb-1.0-0
libcurl4-openssl-dev libncurses5-dev libudev-dev screen
libtool automake pkg-config libjansson-dev
- Download & Install a version of cgminer designed specifically to work with the Antminer on Pi
git clone https://github.com/AdvancedStyle/cgminer</span>cd cgminer
sudo ./autogen.sh #(Grab a cup of coffee, this one takes a while)
sudo ./configure --enable-bmsc #(for the Antminer)
sudo make
- Plug in the Antminer
Plug in your Antminer to the powered USB hub, and then run the following to verify that there is a com device for your USB ASIC.ls /dev/*USB*
- Sign up for a mining pool
To use cgminer, you should join a mining pool. This greatly increases the speed at which new blocks are found, and you share the pot with others. For this tutorial, I’m using BitMinter. There are plenty of others, and they all pay out slightly differently, so I’d suggest you review:
Comparison of mining pools wiki - Crank up cgminer and start earning
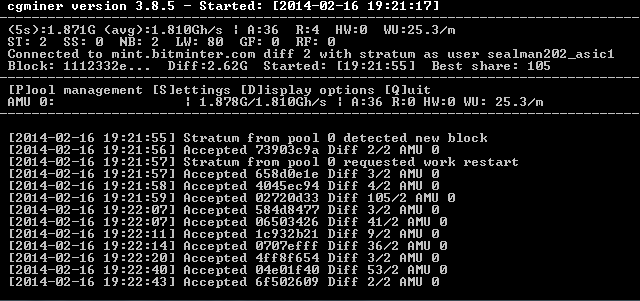
Let’s start cgminer and check everything out.
To start cgminer from ‘/home/pi/cgminer’:sudo ./cgminer --bmsc-options 115200:20 -o mint.bitminter.com:3333 -u username_instancename -p x --bmsc-freq 0781 --api-allow W:0/0 --api-listen
Pool Url: Change this to the one provided by your pool if not using BitMinter
Username: Change this to your username. For BitMinter, it’s your username, underscore, instance name. You just make up the instance name, so username_instance1 would work.
Password: BitMinter will accept any password, so most people just use an x.
If you’ve done everything correctly, within a minute or so, Cgminer should start, connect to the pool, and begin processing work for it. You’ll see an overview screen somewhat like the following:
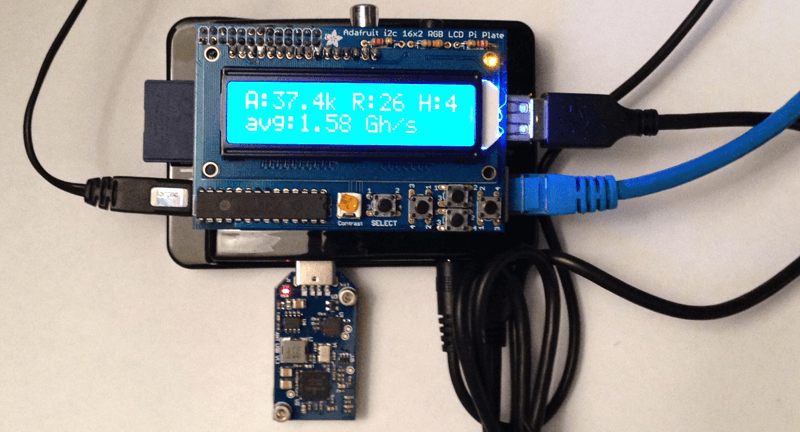
- Report Usage on the Adafruit 16×2 LCD Plate
As part of Adafruit’s tutorial on creating a bitcoin mining rig, they offer some Python libraries and utilities to manipulate the LCD screen, and further, to hook into cgminer’s API.
These tools are a great starting point, but the cgminer API implementation is a bit outdated. Adafruit mentioned they are using cgminer 3.1.1, whereas the custom build that supports the Antminer device is 3.8.5. In the time between those two releases, some elements of the API have changed, and as a result, the files provided by Adafruit don’t entirely work. I decided that I would play around with the python a bit myself, and make a dumbed down version that might be easier for novice python users to work with. It removes a lot of functionality, but I think it also makes it a little easier for a novice to see what’s happening.
Repository: https://github.com/tghamm/PiMinerSimple
From /home/pi, do the following:git clone https://github.com/tghamm/PiMinerSimple.git
Now, if you’ve already got cgminer running, we need to stop it, and re-run it using the nohup command, so that we can return to the console to run PiMinerSimple.
Use Ctrl + if you need to exit cgminer, or, you can always restart the Pi.Now, let’s start cgminer as a background application. It’s almost the same as before, but with a couple of small changes.
From home/pi:cd cgminer sudo nohup ./cgminer --bmsc-options 115200:20 -o mint.bitminter.com:3333 -u username_instancename -p x --bmsc-freq 0781 --api-allow W:0/0 --api-listen &
When you run this, the application will start and you will be returned to the console.Now let’st start PiMinerSimple.
From /home/pi:cd PiMinerSimple sudo nohup python PiMinerSimple.py &
That should activate the the LCD, and after a few seconds, should start reporting statistics from cgminer.
That’s it! - Setting these up to auto-start when the Pi starts
The last step to this is to add both programs as startup applications. To do that:sudo nano /etc/rc.local
You’ll see a file like:

We need to add our code just before the “exit 0” line. So, let’s add:cd /home/pi/PiMinerSimple python PiMinerSimple.py & cd .. nohup ./cgminer --bmsc-options 115200:20 -o mint.bitminter.com:3333 -u username_instancename -p x --bmsc-freq 0781 --api-allow W:0/0 --api-listen &
Note: Remember to substitute the correct parameter values! Save the file, and reboot your Pi. When it reboots, both applications should start, and you’ve now got yourself a turn-key bitcoin mining rig!
Step 4 – Profit (Not actually, you will net negative dollars)
Thanks for stepping up and making these changes.
I am getting an error when loading your PiMinerSimple file:
$ git clone https://github.com/tghamm/PiMinerSimple.git
Cloning into ‘PiMinerSimple’…
error: The requested URL returned error: 403 while accessing https://github.com/tghamm/PiMinerSimple.git/info/refs
fatal: HTTP request failed
Any idea why? Go easy on me, I’m a newb…
No problem! That’s strange. I just tried it myself on a clean machine and it works, but I checked over at StackOverflow to see if that had happened to anyone else, Take a look at this: http://stackoverflow.com/questions/12538130/cant-clone-a-github-repo-on-linux-via-https. Does it work if you try using your username like the top answer suggests? Seems like a local git configuration/security thing. Let me know if I can help further, and good luck!
What if you have multiple Antminer’s? Is there any different configuration, or will it work the same whether you have one Antminer plugged in, or several?
Hi. Its possible also to use more than one antminer u1? Thanks